Pages

Showing posts with label Egg-free. Show all posts

Sunday, November 17, 2013

Egg and Dairy Free Birthday Cake

A friend of mine has a little girl the same age as Poppet with an egg allergy. We see them a couple of times a month, and I often like to bake a treat for the kids and the grown ups, so I kind of made it a challenge to come up with a variety of egg-free treats that the littlies like. Since the egg allergy diagnosis, my friend has observed some other food intolerances including dairy. While there are plenty of egg-free recipes out there, omitting dairy from the equation makes things a little more difficult. I'm always up for a bit of a challenge in the kitchen, so when my friend asked me if I would make her daughter's third birthday cake, I replied "Challenge accepted!"

I really didn't want to go down the "pretend egg" route so looked for some tried and tested recipes out there. Needless to day there was a lot of sampling going on in my house in the month leading up to the birthday. I tried a chocolate cupcake recipe which stuck to the roof of your mouth, then kind of dissolved into a sticky mess in your throat. I tried a vanilla cake recipe that looked and tasted like a pancake. It was an improvement on the chocolate attempt but was hardly birthday-cake worthy. I was beginning to think I might have bitten off more than I could chew (pun completely intended) when I googled "egg substitutes" and found this page. I pulled out my beloved Golden Circle copy of Cooking: a common sense guide, and picked out a simple butter cake recipe and egg- and dairy-free'd it. My plan was to start at the top of the egg-substitute list and work down until something resembled a cake in taste and texture. Fortunately for me, the first on the list worked a treat (I crack myself up). The resulting recipe looked like this:

  • 125g Nuttelex (sunflower based butter/margarine substitute)
  • 3/4 cup raw caster sugar
  • 2 tsp baking powder + 3 tbsp water + 3 tbsp sunflower oil (to replace 2 eggs)
  • 1 tsp vanilla extract
  • 2 cups self raising flour
  • 1/2 cup almond milk
Buttercream icing
  • 60g Nuttelex
  • 1/3 cup icing sugar
  • 1/2 tsp almond essence
  1. Preheat oven to 180C. Grease and line 20cm round cake tin.
  2. Cream Nuttelex and sugar using an electric mixer until light. Mix baking powder, water & oil in a bowl then add to butter mixture gradually, beating well after each addition. Add vanilla essence and beat to combine.
  3. Transfer mixture into a large bowl. Fold in the sifted flour alternately with the milk. Stir until just combined. Spoon into the tin and bake for 45 mins or until a skewer inserted into the middle comes out clean. Leave in the tin to cool a little then turn onto a wire rack.
  4. To make the buttercream, beat Nuttelex and sifted icing sugar with an electric mixer until light & creamy. Add the almond essence and beat until smooth and fluffy. Spread over the cold cake and decorate as desired.
I doubled the recipe as I was making a number 3 and needed two round cakes to do this. The cake itself turned out really well. Moist yet fluffy, and held its form well enough to cut and shape. Getting the buttercream right was a bit more tricky. Nuttelex has quite a distinct flavour and this wasn't masked by vanilla extract, which is why I used almond essence. That stuff is strong! Definitely strong enough to hide the fact that there's no butter in that icing. You could probably get away with 1/4 tsp. A three year old birthday also called for something more exciting than plain white icing, so I used pink and blue food colourings to make pink and purple. The oil in the Nuttelex can cause the buttercream to separate a little, and this was more obvious when using food colouring, leaving the icing a little streaky and clotted-looking. I tried to minimise this by keeping the colours fairly light. You can see the streaking slightly in the pic of the cupcake below. The resulting cake (and cupcakes) was impressive, even if I do say so myself. Those who didn't know it was egg- and dairy-free didn't pick it, and those who did commented on how "normal" it tasted. I actually preferred the taste over a normal butter cake which I usually steer away from.


The cut parts of the cake (the inside edges of the number 3) were difficult to ice, and I used a flat tip on my piping bag and piped in strips so as not to agitate the cake crumb. This looked a little bit dodgy but less dodgy than having cake crumb strewn through the icing.


Even the little coloured balls on top were egg-, dairy-, soy- and everything else-free.
 
My friend's little girl enjoyed her cake, but has since removed gluten from her diet in an attempt to get a handle on food intolerances. This is a challenge I am yet to have much success with! If anyone has any egg-, dairy- and gluten-free recipes that are tasty and don't dry out within hours of baking, I'm all ears. 
 

Saturday, August 31, 2013

In My Kitchen - September 2013

That's right folks, it's September, and my first "In My Kitchen" post since January. Actually only the second post since Blossom was born. I've been busy, very busy. In the few weeks after Blossom's birth we bought one and sold two houses, Chicky started school and I started running again. We moved into the "new" house (which is actually about 50 years old) in March and while I have been mostly working on rearing three little and very individual princesses, Hubby has been working on making the house our home. There is plenty of time to talk about that, as the renovations will likely go on for the next 25 years. Needless to say something had to give, and that was the blog. I'll ease myself back into things by telling you about what is in my new (read: old and manky) kitchen in September.

This is the oven that was in the house when we bought it. 


The only thing it's got going for it is the lid. It has a hinged lid that closes over the 5 (who needs 5??) burners. The kitchen is short on usable cupboards and bench space so I often use the top of the stove as my main prep area. Both stove and oven are gas, which is fine. I'd never used a gas oven before and had no idea what "gas marks" meant. Where I was looking for a temperature gauge I found the numbers 1 through 8 plus a star. The element is at the bottom of the enormous oven, and while it is fan-forced, heat circulation isn't even. I burned the bottom of everything for the first few weeks. Long and low seems to be required for even cooking. I much prefer quick so I'll be opting for a smaller electric oven when we do eventually re-do the kitchen. And while I do like a gas stove, the burners seem to have way too much gas coming through. There is no such thing as low, and simmering looks more like boiling. While I seem to be doing a lot of complaining, I am making do and it has helped me to figure out what I want out of a stove/oven.

In June a friend of mine asked me to make her 3 year old's birthday cake. This was an egg-free, dairy free cake for a child with allergies (recipe to come). I thought it was about time I bought a cake board as I have been wrapping my chopping board in birthday wrapping paper if ever I wanted to display a cake in the past. This pretty thing was only a few dollars at my local supermarket.


It had been a long time since I had done a chocolate order, and while I was making do with buying odd bits of decent quality chocolate at the supermarket when needed, I was running out of cocoa so it was time to replenish stocks. In my kitchen is a dangerous amount of Callebaut and Sicao chocolate.Well actually there is a little less than what is pictured as I got stuck into making some banana choc chip muffins, chocolate ice cream and choc chip cookies as soon as it arrived.


The online store I buy my chocolate from also had these cute chocolate transfer sheets on sale. I've never used a transfer sheet before but look forward to prettying up some chocolate soon.


My birthday was in June and instead of buying me a token gift, my mum asked me to buy something I wanted and she'd reimburse me. It took me a couple of months to decide what I really wanted but settled on a 30cm Cuisinart Saute Pan. I didn't actually know such a thing existed until I went shopping for a "deep frypan with a lid", only to be told I meant a saute pan. Sure, call it what you like, this puppy is awesome. I use it for pasta sauce, curry, stir-fry, anything really. I always make enough dinner for the 5 of us plus leftovers so this pan gets a workout most days. And it's so shiny! Thanks Mum!


The final part of my kitchen I will showcase this month is a gift from my local Maternal and Child Health Nurse. At Blossom's 3 month check-up she asked how we were doing and how everyone was adjusting to the new addition. I explained what a whirlwind the last few months had been and maybe she saw something I was trying to suppress, as she reached into her filing cabinet and handed me "Top Tips to Help You Reduce Stress". It lives on my pantry door and I consult it daily. I think we're doing ok.


There are a few more exciting things in my kitchen, but I'll save them for next time. Head over to Fig Jam and Lime Cordial to see what's going on in some other kitchens.

Friday, December 14, 2012

Ginger Shortbread People

I was up at 5am this morning to walk/run with a very patient friend who doesn't seem to mind that I can't run more than a couple of kms at a time at the moment and is happy to walk the rest with me, even if we are STILL getting swooped by magpies in December! Everyone else in the house was awake when I got home and once the breakfast thing was over I'd been up for so long it felt like it must be midday. It was 7:30. What do you do when you've done everything by 7:30am? Bake (while waiting for another friend to bring much needed coffee).

I have a basic shortbread recipe that you can add to, to spice it up a bit. I got this from a Super Food Ideas magazine a few Christmases ago. I used it to make Ginger Shortbread People.

Basic Shortbread
250g butter, softened
2/3 cup caster sugar (I use raw)
2 tsp vanilla extract (I use home made)
2 cups plain flour, sifted
1/2 cup rice flour, sifted

Additions to make it Ginger Shortbread
3 tsp ground ginger
2 tbsp golden syrup
1/4 cup rice flour
  1. Beat butter, sugar and vanilla until light and fluffy.
  2. If making ginger shortbread, add ginger and golden syrup, beat to combine.
  3. Add flours and combine (including the extra 1/4 cup rice flour if making ginger shortbread).
  4. Roll dough out between 2 sheets of baking paper until about 3mm thick. Refrigerate for 30 mins.
  5. Preheat oven to 160C (140C fan forced). Line 2 baking trays with baking paper.
  6. Cut out "people" shapes and and place on trays, being careful not to "snap" the dough as it is quite firm when cold. If decorating with M&Ms etc, do this now, otherwise shapes can be iced once cooked and cooled.
  7. Bake for 8-10 mins or until just golden. Cool on trays for 5-10 mins then transfer to a wire rack.

Aside from the refrigeration time, these were really quite quick to knock up, and they have the added bonus of being egg-free for those with allergies. I halved the dough and put half in the freezer for another day, and still made about 15 small gingerbread people (of which I've eaten far too many today). The 4 little people that were here this morning all gave them the thumbs up, and it even kept my friend's little boy still and happy long enough for me to cut his hair! 

Thursday, September 6, 2012

Muesli Cookies

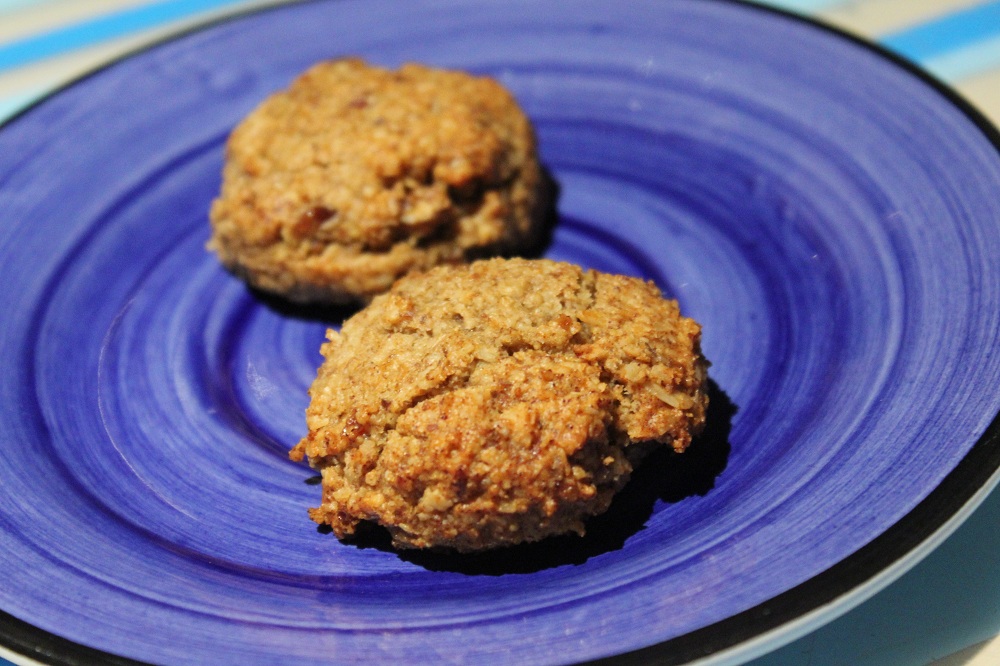
We all love muesli bars at my house, perhaps a little too much. A batch rarely lasts more than a day, and so I've been looking for a slightly healthier alternative that we can all enjoy with a little less guilt and a little less exercise required to counteract the over-indulgence. I often scan Teresa Cutter's website in search for healthy ideas, and last week gave her Oatmeal Honey Scones a go. They were a big hit! They are egg-free and dairy free which doesn't bother our household specifically, but I have a few friends whose children have allergies so another recipe up my sleeve is a bonus. They are also super quick to whip up. As always, I added a bit of lib with the recipe, using what I had on hand, so here is my version:

2 1/2 cups rolled oats
1 tablespoon linseed, soy & almond (LSA) mix
1/2 teaspoon bicarb soda
1/4 cup honey
1/4 cup sunflower oil
1/2 teaspoon ground cinnamon
1 teaspoon vanilla extract
1 ripe banana
120g chopped fresh dates (pitted)

  1. Preheat fan forced oven to 160C. Line a baking tray with baking paper.
  2. Place everything minus the dates in a food processor and whiz for 20ish seconds until everything is combined and the oats are mostly chopped.
  3. Add dates and whiz to combine.
  4. Spoon about a teaspoon worth of mixture for each cookie onto the baking paper and flatten slightly.
  5. Bake for 10-12 minutes or until slightly brown and just starting to crack on top.

I made these into 22 little Muesli Cookies, whereas Teresa Cutter made 8 large "scones" out of the same size batch. That way the kids could have a couple and feel like they were being spoiled (and without any sugar or butter, I could have a few and not fear for my arterial health). They are really yummy. I think they might actually taste better than our muesli bars, and of course the recipe is open for experimentation. I've made 3 batches of these since discovering the recipe, but I think I'll try playing with the ingredients next time, maybe changing the fruit and adding some other seeds. FYI, they don't set hard like a biscuit, they are quite soft, I guess given there is no flour.

On another note, I have just been introduced to The Book Depository. How I didn't know about this before is beyond me, but they do free shipping world wide, and their prices are amazing! Needless to say I have a few Nigel Slater gems headed my way.

And on yet another note, we found out today that Chicky and Poppet will be getting a sister in January.