Pages

Tuesday, February 28, 2012

All Day Breakfast Muffins

With a few big races approaching, I've really been ramping up the training. I'm now running about 40+kms a week so thought I should start paying a little more attention to nutrition to see if I can crack a few PBs in the upcoming weeks. We normally eat well as a family, but I'm definitely guilty of hiding behind a cupboard door and scoffing some chocolate when the kids (and hubby) aren't looking. So I've been giving a few nutritional snack recipes a try, with lots of success.

I really enjoyed the Raw Chocolate Brownie that I made last week so decided to consult Teresa Cutter again. Breakfast is fairly uninspirational for me. Poppet demands "toast!" daily, and Chicky may or may not want to add some sort of cereal, so I thought I'd try something a bit different, a bit fun and a lot healthy that we might all enjoy - breakfast muffins. Teresa Cutter calls these ones Muesli Muffins. This recipe calls for wholemeal spelt flour which I've never baked with before. Spelt is a cereal grain that has fewer calories and more protein than wheat flour. I'm certain you could use wholemeal wheat flour in its place with little taste or texture change. My local green grocer stocks a comprehensive range of natural, raw, organic and just unusual ingredients so of course he had spelt flour, along with some other interesting things I picked up for future baking adventures.


I made a couple of small changes to the original recipe. We don't like raisins much here, so I used currants instead, and replaced the ground flackseed with linseed, soy and almond (LSA) mix. I also used my Easiyo-made natural yoghurt. The result was really tasty and even hubby and the girls liked them! It was a lovely change from toast with vegemite, and I think I'll be adding this one to the "regulars" list. Like the title suggests, these gems should not just be saved for breakfast, but make a great, healthy, filling snack for whenever the munchies hit.

Thursday, February 23, 2012

Raw Chocolate Brownies

A few weeks ago my sister in law came over with some "raw brownie" which she had made. I was a bit sceptical that something which had no butter, sugar, flour or chocolate, and with a "frosting" made almost entirely of avocado, could even vaguely resemble a brownie. I sampled it none the less, and was surprised at both the taste and the texture. It tasted chocolatey, it was moist, the frosting was soft and tasty and it left a nutty taste in my mouth, all assets of a good brownie. It didn't taste conventional but it certainly did give me a brownie fix.

I didn't think much more about it until I stumbled acrossed Teresa Cutter's website, The Healthy Chef, a few days ago and read about many more "raw" ingredients and recipes. She has a Chocolate Fudge Brownie recipe which I gave a shot today. Making this brownie, which involves processing nuts and dates together, has re-enforced the need for a food processor in my kitchen. The processor attachment to my stick blender, which comes in useful for occasional processing, doesn't quite cut it for recipes like this. I was also unable to add the frosting because I couldn't make the macadamia nut butter Teresa used on her brownies, without a decent food processor. I think that will be the next addition to my kitchen. An alternative to the macadamia nut butter can be made by blending the following in a food processor (this is what my sister in law made for hers):

1 avocado
40ml honey
30ml cocoa powder (raw if you like)
2 tsp vanilla extract
pinch salt
pinch cinnamon

I didn't have any avocado, so my brownies remained frosting-less.


The combination of walnuts, almonds, fresh dates, raw cacao and vanilla extract produced something unbelievably healthy and mighty tasty. The only part I didn't consider when using my homemade vanilla extract was the fact that this recipe is not cooked, therefore the vodka used for the extract has full potency. It's only 2 tbsp for about 12 pieces of brownie, but still more than I'm willing to let the littlies sample. If you want to make this for the kids, I'd recommend getting some imitation stuff from the supermarket.

Watch this space for some more raw recipes!

Wednesday, February 22, 2012

Mixed Seed Bread

I don't make bread very often. In fact I seem only to make bread if I realise, after I've been shopping, that I need bread. I used to own a bread maker but didn't like the shape or the consistency of the bread it made and so sold it recently to free up some of my very small kitchen bench.

I've tried a few bread recipes over the years, but keep coming back to the Mixed seed bread recipe from my Wizz Mix Professional instruction book. I rarely follow a recipe exactly, and this is no exception. I follow neither the ingredients list or the methodology to the letter. The original recipe specified far more salt and sugar than was either necessary, or I felt comfortable with. I also use whichever seeds I have on hand. Here is my version. Note I always weigh the flour and water rather than use cup measurements:

2 cups (300g) bread flour
2 cups (300g) wholemeal flour
2 tablespoons milk powder
1 tsp salt
1 tbsp raw sugar
1 tsp bread improver
2 tsp dried yeast
2 tsp oil (I use sunflower)
up to 440ml water
8 tbsp seeds (I normally use a combination of whole linseeds, sunflower seeds, pepitas and a tasty little ground mix of soy, linseed, sunflower seeds and almonds, pictured below)
extra bread flour for kneading
extra seeds for the top if you like


  1. Combine flours, milk powder, salt, sugar, bread improver, yeast and seeds in a large bowl. If you have an electric mixer with a dough hook you can use it for the next step. If not, it's time to get your hands dirty!
  2. Slowly add the oil and then the water to the dry ingredients. Only add enough water to bring the ingredients together to a soft dough. I never use the full 440ml, normally more like 400ml.
  3. Turn the dough out onto a lightly floured surface and knead by hand for about 5 minutes, until the dough is soft and pliable.
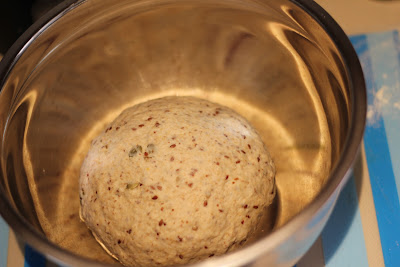
  4. Place the dough ball back in the bowl and cover loosely with plastic wrap. Leave in a warm area to rise until it doubles in size.
  5. Knead the dough again for another few minutes.
  6. Shape the dough into a roll and place into a lightly greased, large loaf tin. Cover loosely with greased plastic wrap and leave in a warm area until well risen (40-50 mins). Remove plastic wrap.
  7. Spray or brush a little water on the top, add extra seeds if you like and bake in a preheated oven at 200C for 30-40 mins or until golden brown.
  8. Remove from tin and cool on a wire rack.

This bread is lovely. The almond mix really adds to the flavour, it's as large as a commercial loaf and slices beautifully as it is quite dense. I'm not entirely convinced of the necessity of either the bread improver or the milk powder, but given I nearly always make this in a rush, when I NEED bread, I haven't had the opportunity to remove them and see what happens. I'll add it to my "to do" list one weekend soon.

Sunday, February 19, 2012

Reclaiming the land

When Poppet was born, Chicky was almost 2 and really starting to get around. We are fortunate enough to have a decent sized block of land with both a big front and back yard. Most of the yard was grass when we moved in 7 years ago so it was a bit of a blank canvas. Behind the house, we've added the chicken coup and run, added a cubby in one of the garden beds for the kids, poured concrete paths for the kids to ride and run around, and claimed a section of the driveway for my vege patch. Our yard is great for a young family, but I find myself deciding which veges to sow in the given space. Rather than be forced to choose, I decided to reclaim some land.

The front yard is largely grass, which needs watering, then grows, then needs mowing, then the cycle starts again. One day late last year, while hubby was at work, I decided to start ripping up grass to prepare for another vege patch out the front. I started with a rectangular strip, then an L-shape, and just kept going until I had an area as wide as the house and about 2 metres long. This weekend we got some old railway sleepers to edge the garden bed. It's looking great. Here's a sneak peak. I can't wait to get some soil and start planting!

Wednesday, February 15, 2012

Good Things, Small Packages

After several culinary failures last week, I was determined to make amends with my inner cook and pump out some tasty treats this week. The theme: small. I much prefer to make mini muffins over regular sized, as I can give them to the girls with only a small pang of guilt about feeding them a combination of butter and sugar. I've also, with lots of hard work, managed to shed a few unwanted kgs over the last few months, and don't particularly want them to return. So, as far as baking goes, bigger is not better.

On Tuesday, I had a banana that had seen better days sitting in my fruit bowl. Just 1. My favourite banana choc chip muffin recipe requires 2 bananas, so it was a perfect opportunity to make a half-batch. I also go to a local community group every other Wednesday so there was ample opportunity to share the baking love. This recipe is super quick and easy, and you can use wholemeal flour if you so desire and it's still just as yummy. For the choc-chips, I used a combination of Callebaut 54% dark callets and 34% milk callets and they were just divine. A half batch made 15 mini muffins and only needed about 10 mins baking time in my oven.


The adult in me (and closet My Kitchen Rules watcher) wanted to make something a little more special for the grown ups. I love flicking through cheap cooking magazines, and they often have good basic ideas that just need a little dressing up. The current issue of Recipes+ had a recipe for Mini Cherry Cheesecakes that looked workable. I made a few small changes to give my version of Mini Choc-Cherry Cheesecakes. Here's the recipe for a half batch, which made 11 mini cheesecakes, but you could stretch it out to 12:

125g/half packet of Granita biscuits
60g butter, melted
1/4 tsp ground ginger
60g dark chocolate (I used Callebaut 54% callets)
1/4 cup cream
250g cream cheese, at room temperature (this is important!)
1/3 cup caster sugar
1 egg, lightly whisked (courtesy of the girls in the garden)
1/2 tsp vanilla extract (I used homemade)
about 250-300g fresh cherries, reserve 12 and then coarsely chop the rest, removing stones
100ml thickened cream, softly whipped
icing sugar to dust

  1. Preheat the oven to 150C (130C fan forced). Line 12 holes of a regular sized muffin tray with paper cases.
  2. Whiz biscuits in a food processor, or bash with a rolling pin (depending on how much angst you need to release) until finely crumbled. Add butter and ginger and combine. Press crumbs into the paper cases and place in the fridge until required.
  3. Put chocolate and cream in a small pan over low heat and cook, stirring until the chocolate has melted and the mixture is smooth. Be careful not to burn. Cool.
  4. Beat cream cheese, sugar, egg vanilla and cooled chocolate mixture in a large bowl until well combined. If the cream cheese is too cold, it will form lumps and won't combine properly. Also if the chocolate mix is too hot, it will cook your egg. Fold in chopped cherries and divide the mixture between the paper cases, on top of the biscuit mix. Level the tops and bake for 15-20 mins or until just set.
  5. Cool in trays, then in the fridge. They need a good few hours cooling before serving. Remove from the paper cases, top with a dolop of whipped cream, a whole cherry and dust with icing sugar.
These look and taste lovely. The fresh cherries are so refreshing, and the dark chocolate makes it feel more adult than a regular cheesecake. The original recipe called for white chocolate, but I don't like white chocolate, so went with dark. It worked. I was a little concerned that there we 11 cheesecakes for us to get through, even if they were mini. Hubby and I had 1 each after dinner, and we let the girls have some too, but that was still going to leave 7 tempting me from the fridge all day today. Hubby took care of that dilemma last night when he greedily went to get a 2nd from the fridge and dropped the container, contents included, all over the kitchen floor. He's lucky I enjoy the process as much as the product, and that I'd already taken photos! Needless to say he felt terrible. Guess I'll just have to make the other half batch on the weekend.

Tuesday, February 14, 2012

A Sunday in the Bush


With a half marathon in the foothills coming up next month, and a 40 mile trail relay in April, it was time to hit the hills for a bit of training. Hubby towed the kids in the bike trailer and rode along side on his mountain bike while I ran 14km up (and thankfully down) some beautiful but painful hills around Dwellingup. I definitely had the edge over the bike on the uphill but couldn't compete coming down. With a maximum recorded heart rate of 229bpm I'd say I was being worked pretty hard. Apologies for the dash reflection in the picture. It was taken through the windscreen while we were driving.

We made sure it wasn't all work and no play however. It's blackberry season, and while the thorns are a real pain while trying to navigate the trails, the fruit is lovely and unsprayed where we were, so we stopped to pick some for the girls. We were entertained by emus, running along the tracks, and had a very close encounter with one. They are quite hilarious to watch at speed, standing so tall and proud, and ridiculously light on their feet. I wish I'd had my camera with me. Post run/ride we cooled off with a swim in the Murray River. What a charmed life my girls live.

While in Dwellingup we decided to pick up a few more chickens for the yard. Our 3 Isa Browns have been declining in egg production lately. It has been very hot, so they may pick up again with cooler weather, but we thought it was a good time to expand the family, with something a little different. The new additions are Cochin chicks. The larger two are 5 weeks old, one is 4 weeks old and the baby is just 2 weeks old.


The baby is just gorgeous, and getting Poppet to put it down is proving to be a challenge. She has claimed it as her own.


The Cochins are paler in colour to the Isa Brown, apparently much more placid and quiet, and their cute fluffy faces really make the hens look like Angry Birds.


The only downside to cute fluffy chicks, is that their genders are unknown. We're hoping for females because 1) we would love some more eggs, and 2) we can't keep roosters where we live. Here's hoping!

Friday, February 10, 2012

In My Kitchen - February 2012

Celia over at Fig Jam and Lime Cordial, regularly posts about new or fun things in her kitchen. She kindly invited me to do a similar post, so here are some of the interesting things in my kitchen at the moment.

For Christmas, my mum bought me this very cute Joseph Joseph utensil carousel. Each utensil has a different coloured, rubber handle. Having some of the regularly used tools on the bench top certainly helps to declutter the second drawer, whose spewing contents hubby detests!


On the bench next door to the carousel lives my Breville Wizz Mix Professional. Another present from my mum, for Christmas a couple of years ago. Secretly, I think she was sick of me borrowing hers. I use this machine all the time, and it's central to most of my baking experimentation. I make gingerbread, cookie dough, cakes and bread using this regularly, and it's even been put to the test with fudge and nougat. It impresses me everytime.


What kitchen would be complete without some good quality vanilla extract? After balking at paying the earth for some decent vanilla in the shops, and failing to settle for a cheaper artificial version, I did a bit of reading and found out how easy it is to make your own. Vodka, vanilla beans, a bit of patience and viola! On the left is some decanted from a previous batch, and on the right a new bottle started last weekend. A 700ml bottle of vodka 6 vanilla beans have provided me with enough vanilla extract to last about 18 months. Most of my friends think I'm "wasting" the vodka, but as I don't drink the stuff I like to think I'm improving it!


Somehow, no matter how many times I insist, a collection of toys always ends up in my kitchen. Inevitably the girls want to help with baking, but more often than not they bore quickly and end up standing on a chair next to me, playing.


Something that does keep there attention for a few minutes though, is a babycino. Sometimes for a special treat, I'll make them some warm frothy milk with this battery operated milk frother, sprinkle it with chocolate powder and serve with a marshmallow. I've had this cheapy gadget for about 10 years, but it's still going strong.


Something else I've had for a very long time is my copy of Cooking: a common sense guide by Family Circle. I'm pretty sure my mum bought me this one too! This time for my kitchen tea party, just before I got married. Do people still have kitchen tea parties? They should, you get some great, useful kitchen gifts. This book is by far the most used cook book in my kitchen, as illustrated by the splatters of grease and dough on almost every page, and the way the inside of the book is hanging out of the cover, no longer attached. I haven't made all the recipes in here, but I certainly have made a lot, and it's often the first place I turn for inspiration, be it for dinner or a sweet treat.


As an open chocoholic, I am very particular about which chocolate I eat, and cook with. About a year ago I bought some Callebaut 54% callets to try, after hearing nothing but praise for the brand. A year later I won't use anything else, and here is what a regular delivery looks like. Don't worry, this batch will last me quite a while. I always make sure I have on hand some Callebaut dutched cocoa, some 54% (dark) callets and some 34% (milk) callets. The Callebaut brand is difficult to get in Perth. There are a couple of local distributors but they either only distribute commercially or the charge the earth. I get mine delivered from Paragon Foods in Melbourne. To save a bit of money I buy Sicao brand dark buttons for melting. Sicao is a Callebaut brand, but as far as I understand is it produced and distributed from Singapore, so is a little cheaper.


Like all other items I've talked about in my kitchen, the following is a much loved, much used, much needed part of who I am, and part of this blog. My Garmin Forerunner 110 GPS running watch. It lives in the kitchen so I always know where it is. Since I bought it from Wiggle in June last year I've worn it on almost every run, logged over 600kms and burned 30,000 calories. These stats drawn only from running (I also wear it while I cycle, and with a heart rate monitor at for other aerobic activities) are just part of the awesome service Garmin provide. I (almost) can't run without this watch. It deserves its own post, and I think I might give it this justice one day soon, but for now, isn't she lovely?


There is always a lot going on in my kitchen, but these things are constants. I'll talk about some of the more trinkety items in my kitchen another time.